Disclaimer: I am a consultant at Amazon Web Services, and this is my personal blog. The opinions expressed here are solely mine and do not reflect the views of Amazon Web Services (AWS). Any statements made should not be considered official endorsements or statements by AWS.
In this post, you will learn how to use Amazon Cognito as an Identity Provider for your ASP.NET Core MVC application. This means that you will store your users in Amazon Cognito and configure your web application to authenticate users through a Cognito Hosted UI.
In this step, you will create a user pool in Amazon Cognito. A user pool is a user directory in Amazon Cognito, where all the identities are stored.
Follow the instructions below to create a user pool in Amazon Cognito.
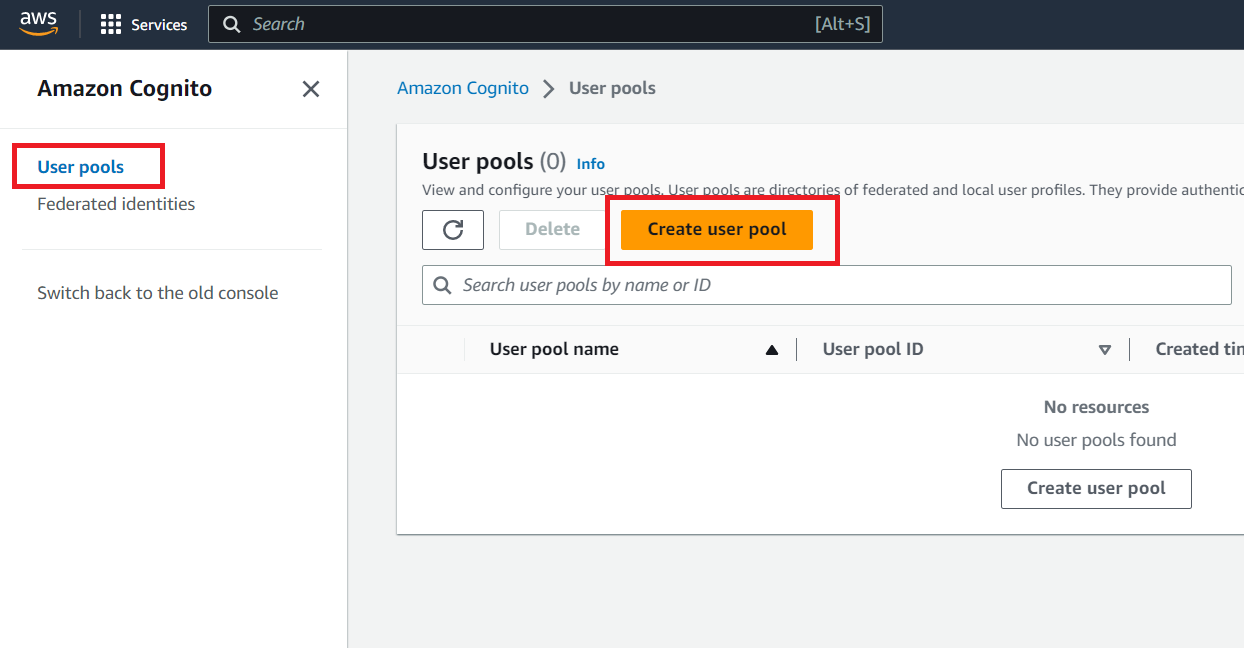
Go to the Amazon Cognito console. If prompted, enter your AWS credentials.
Choose User Pools from the left panel, and then click on Create use pool button.
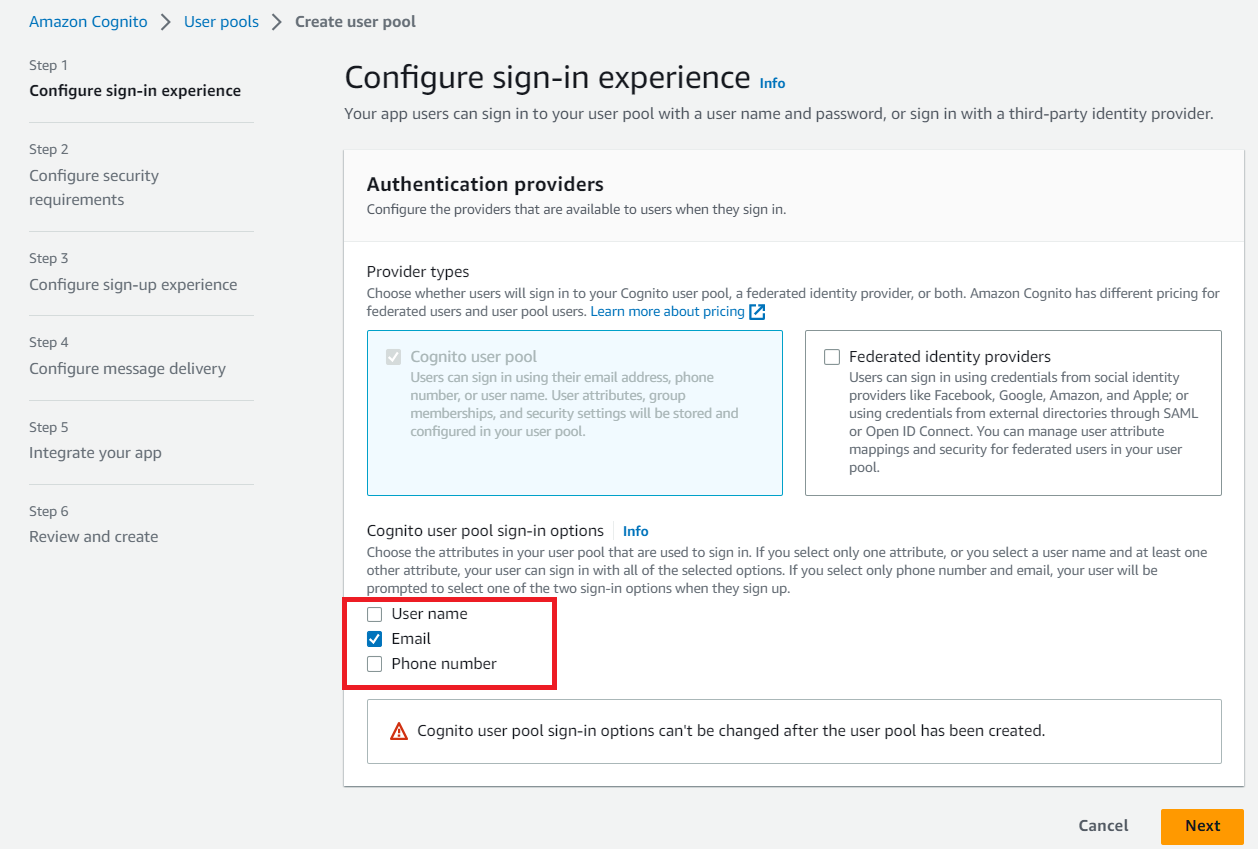
In Configure sign-in experience, choose Email for Cognito user pool sign-in options. Although you can choose User name and Phone number options as well, but just to keep this blog post simple, I am choosing only Email as a sign-in option.
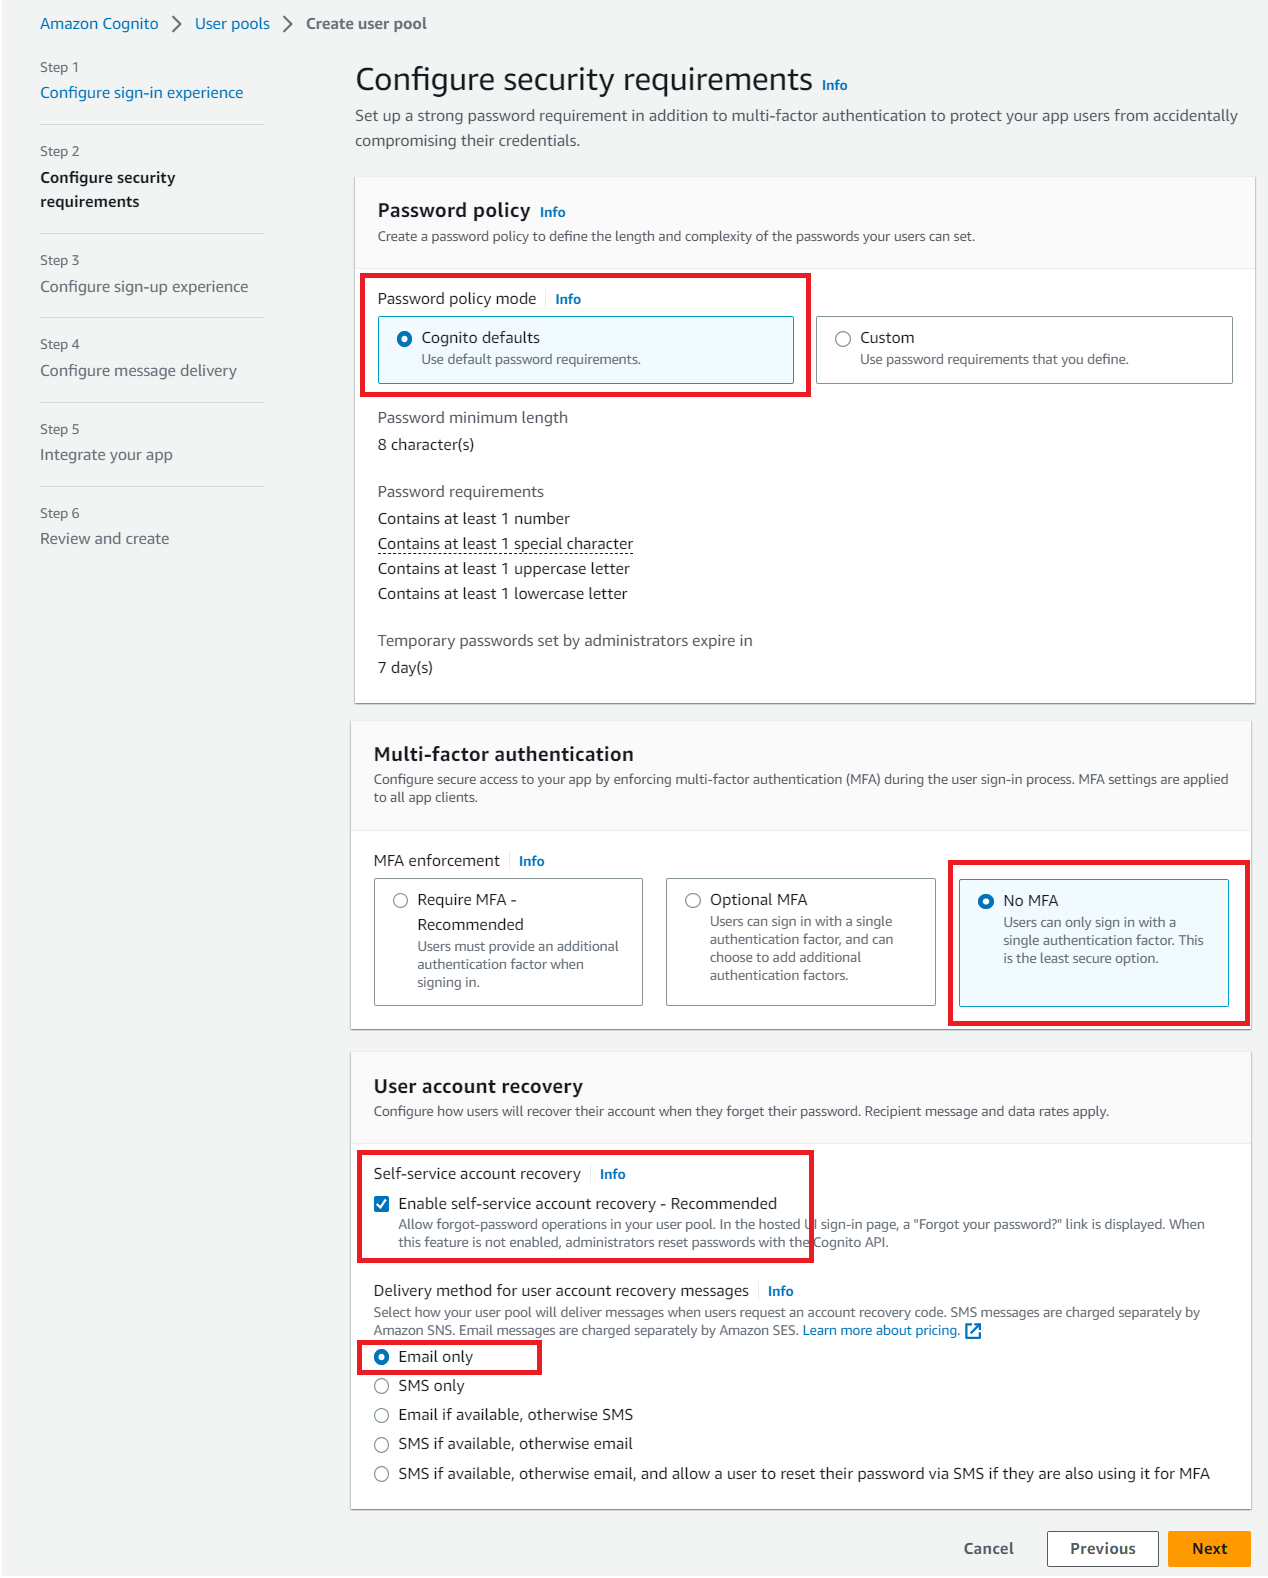
In Configure security requirements, choose Cognito defaults for Password policy, No MFA for Multi-factor authentication, and default values (as shown below) for User account recovery sections.
In Configure sign-up experience, go with the default selection for Self-service sign-up and Attribute verification and user account confirmation sections.
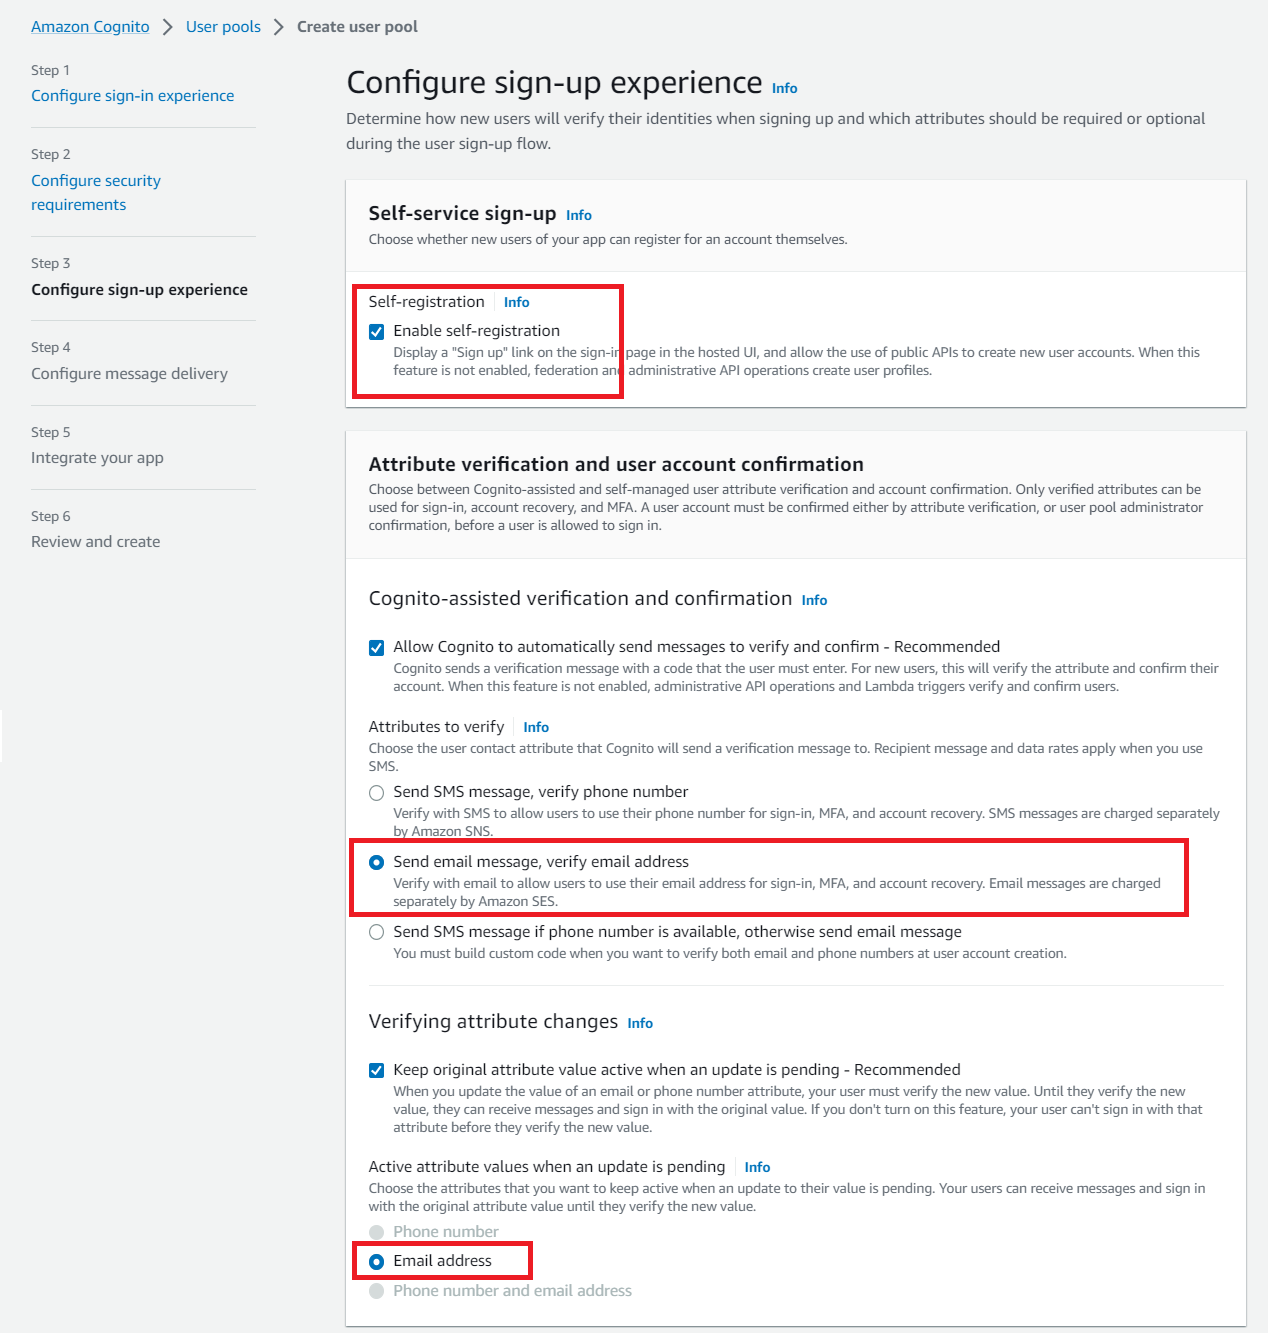
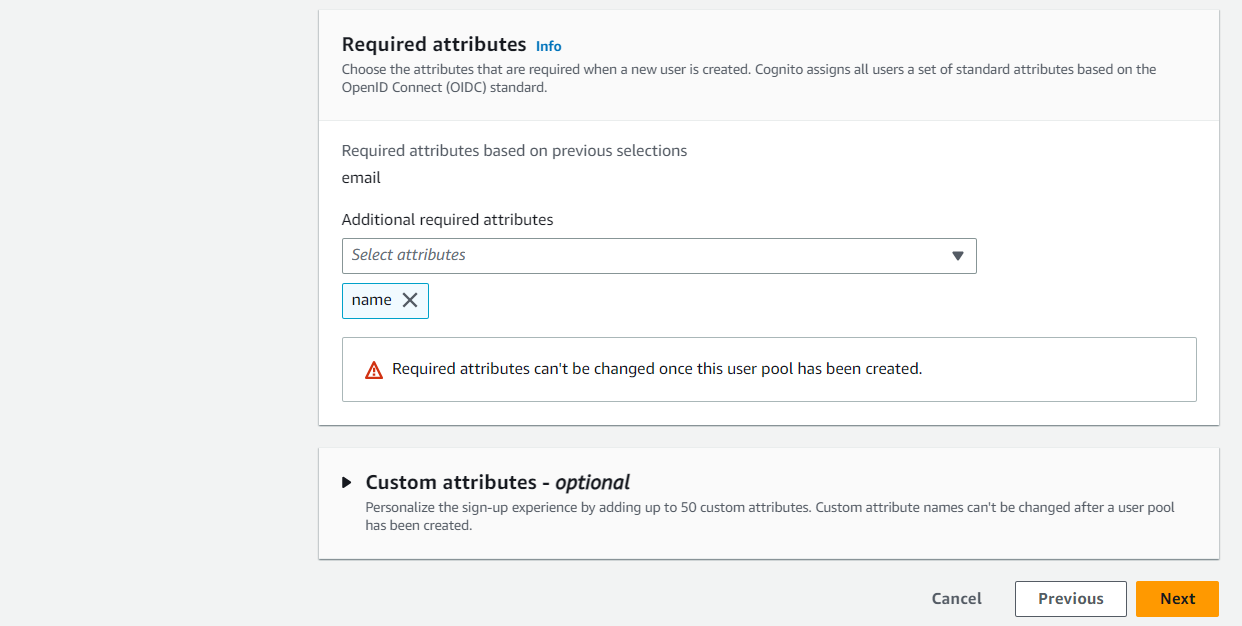
For Required attributes section, choose only name as a required field.
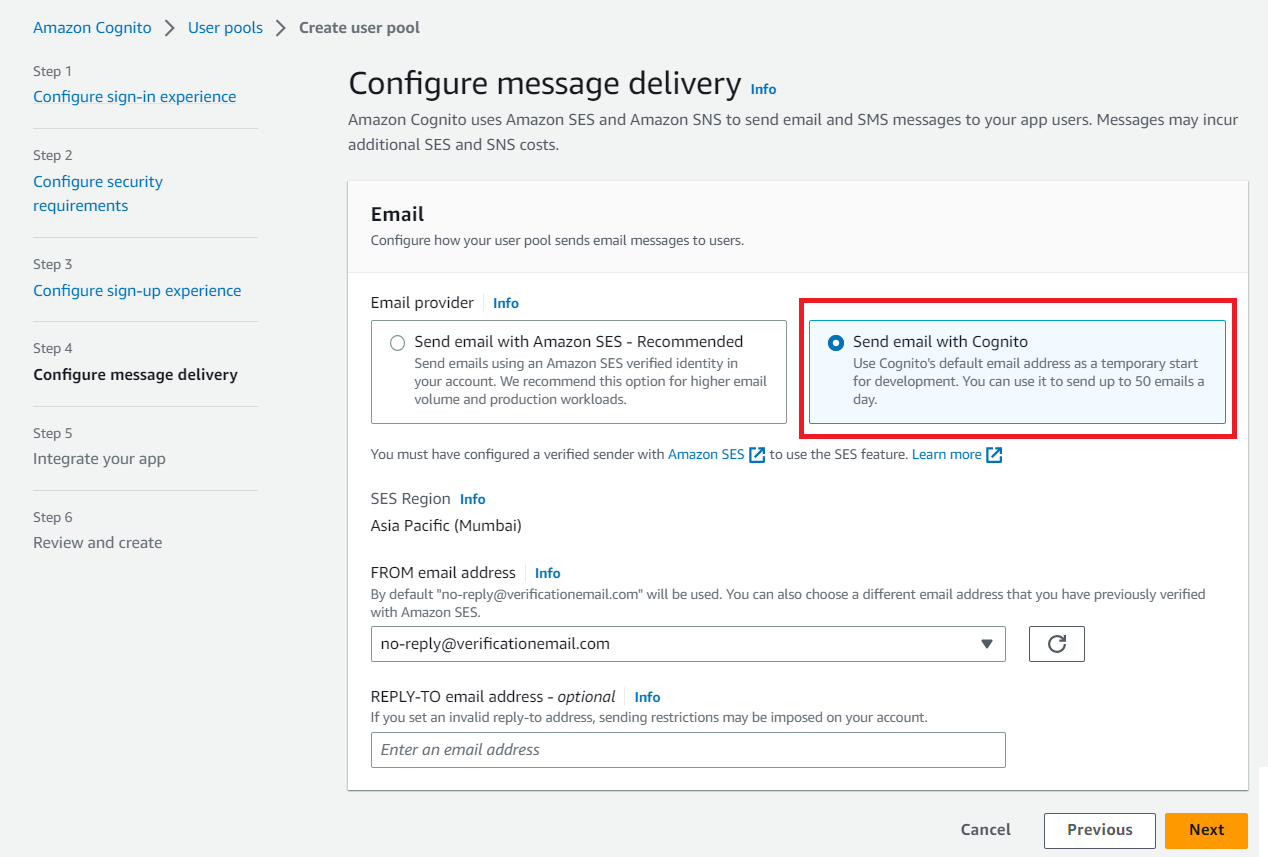
In Configure message delivery, choose how the mails should be sent for events such as Account verification, Forgot password, and so on. Choose Send email with Cognito option here.
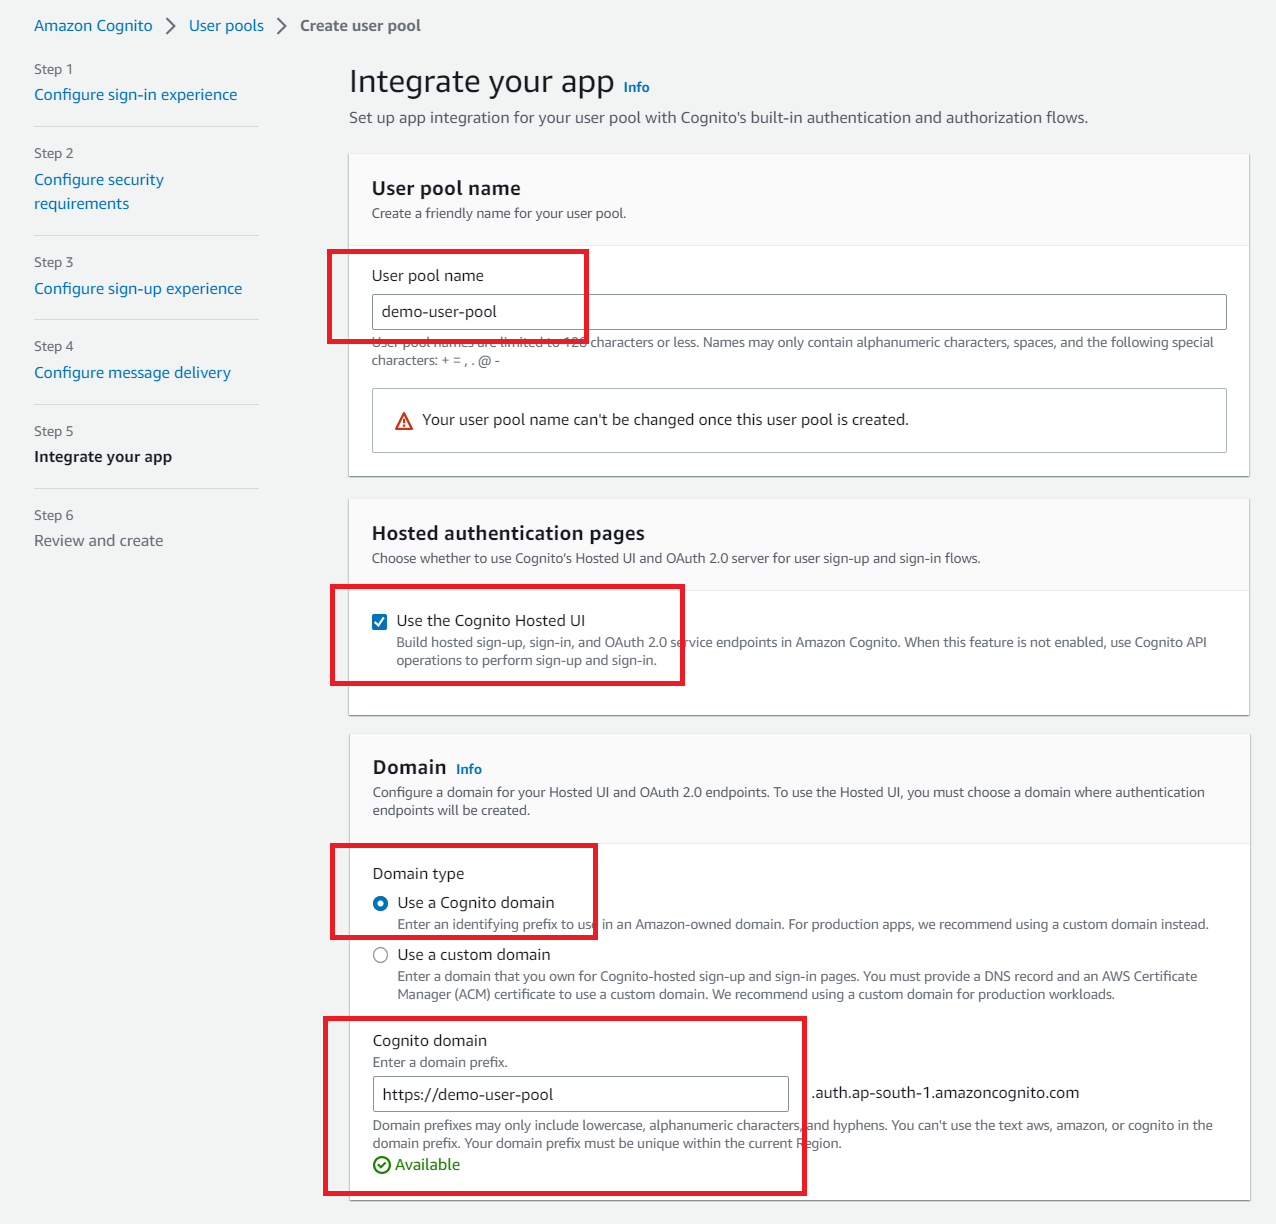
In Integrate your app, enter a name for your user pool, select Use the Cognito Hosted UI, choose Use a Cognito domain option for Domain type, and then enter a name for your Cognito domain.
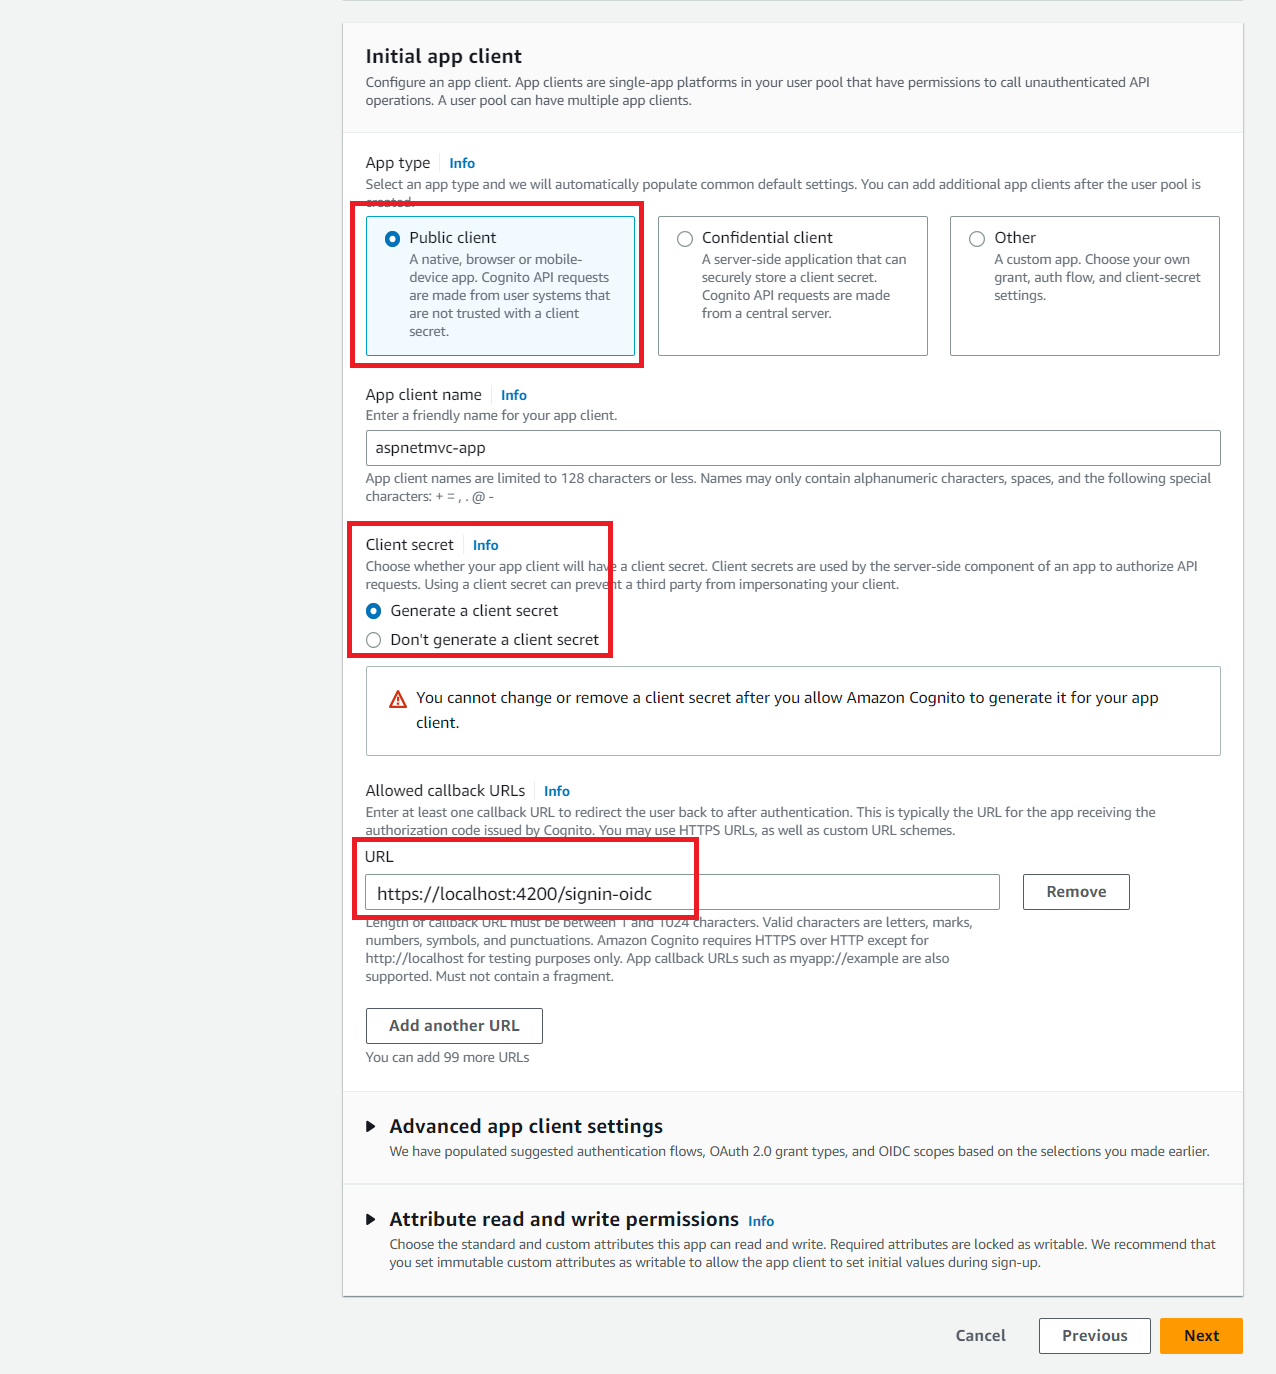
Next, create an app client for your web application. Choose Public client for the App type, choose Generate a client secret for Client Secret, and https://localhost:4200/signin-oidc as a callback URL.
☞ Remember that the callback URL must be HTTPS or you will encounter authentication errors.
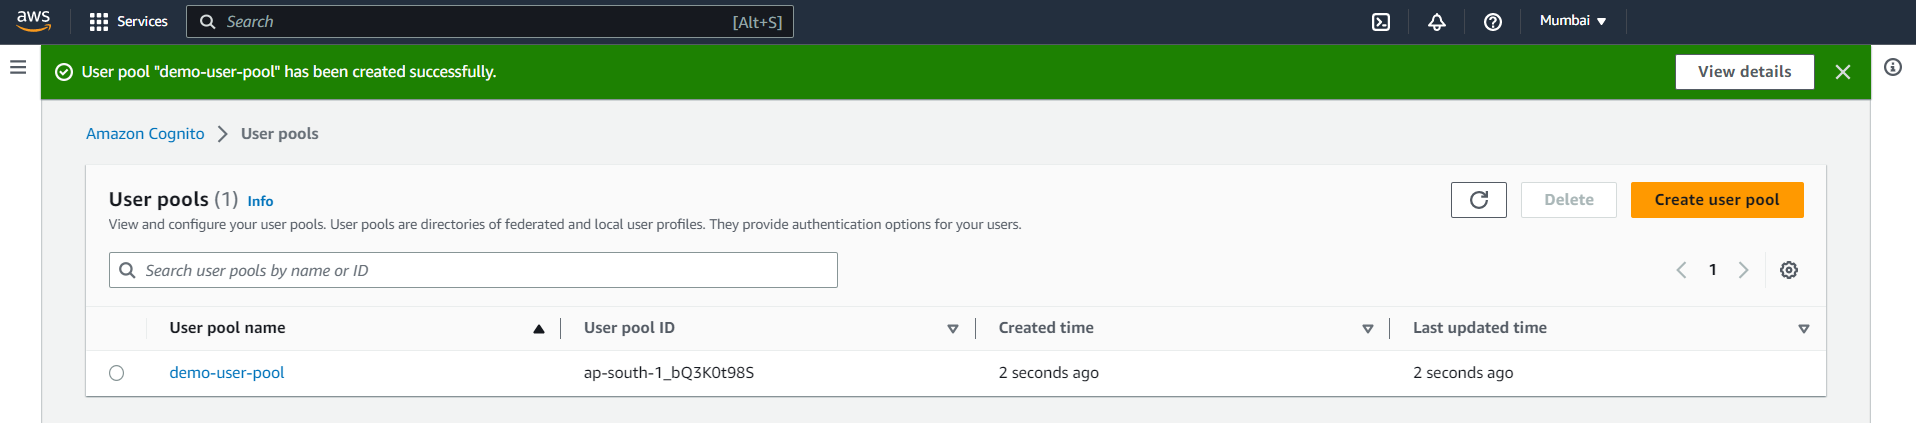
In Review and create, scroll down and select Create user pool to proceed.
Once the user pool has been created, it should look like this.
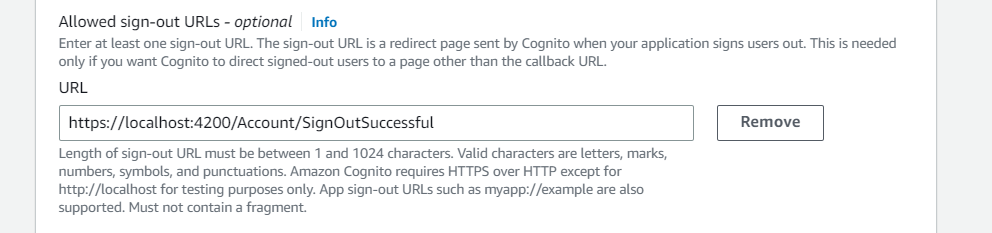
A sign-out URL indicates where your user is to be redirected after signing out.
Follow the steps below to update the sign-out URL.
Open the recently created user pool.
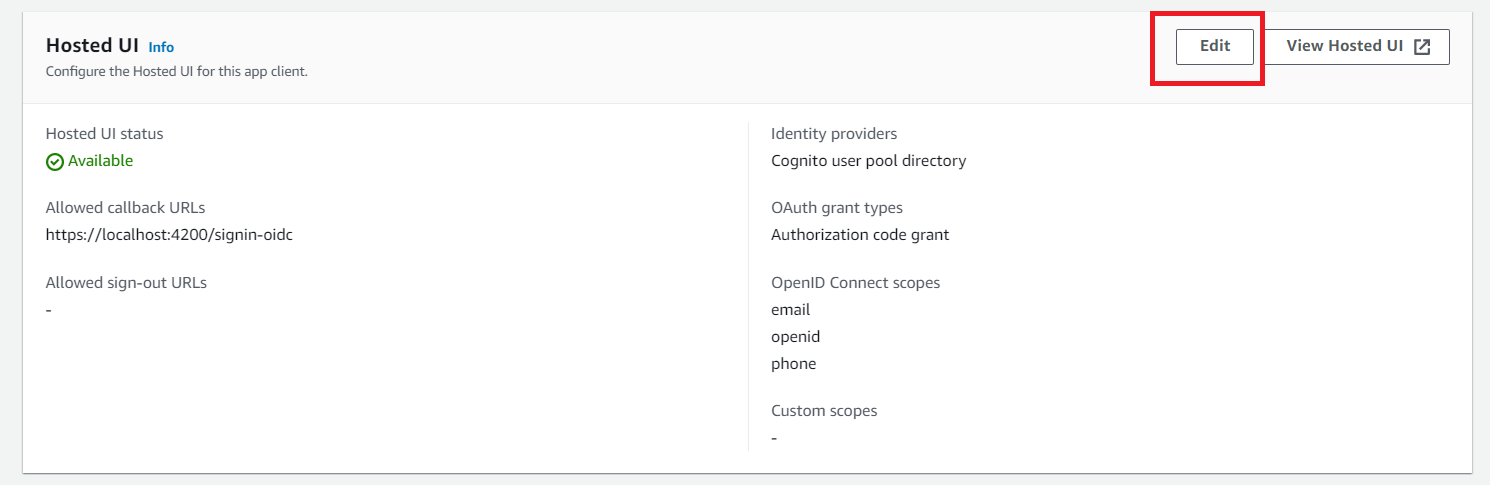
Navigate to App Integration tab, and scroll down to the bottom.
Choose the app client you created earlier in this post.
Click on Edit button in Hosted UI section.
Click on Add sign-out URL button, and add https://localhost:4200/Account/SignOutSuccessful as a sign-out URL.
Let's create a new ASP.NET Core MVC application from Visual Studio.
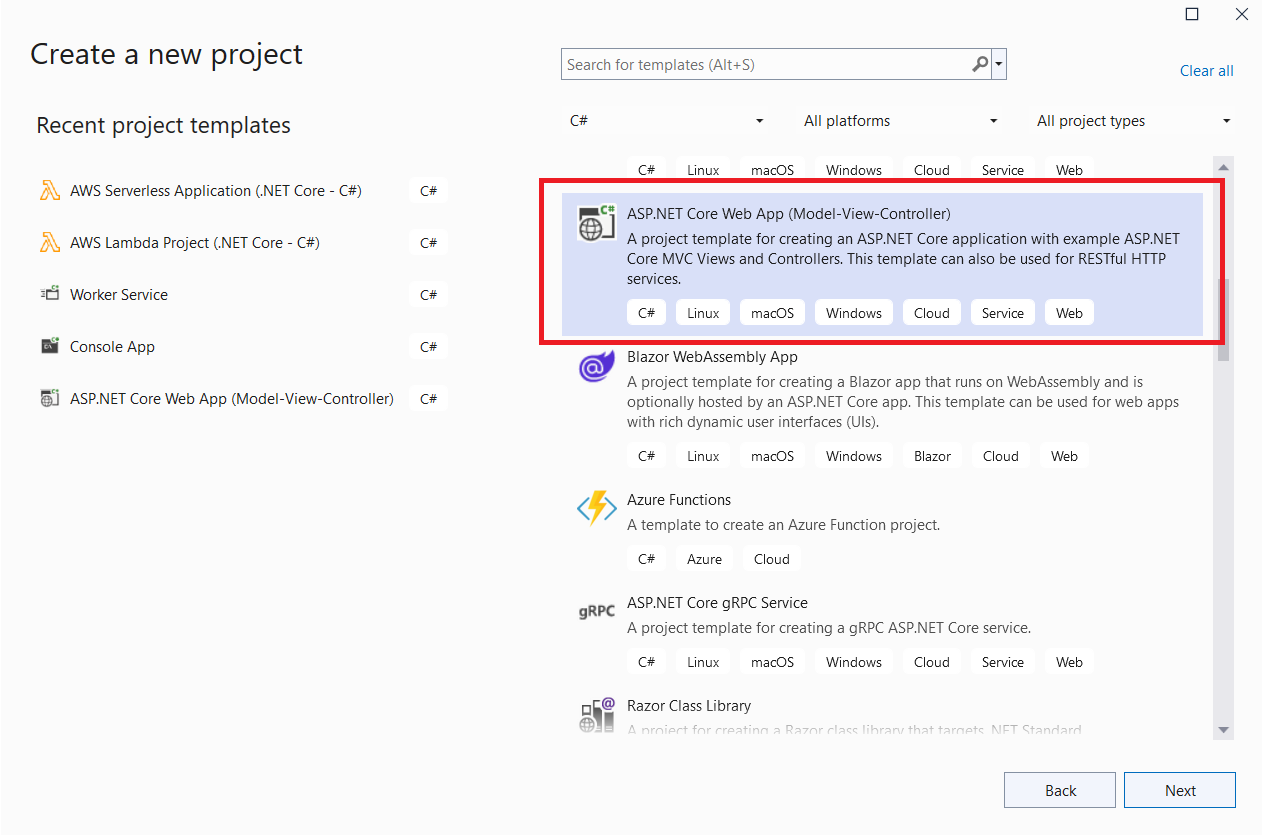
Choose Next, enter the project and solution name, and then press Next again.
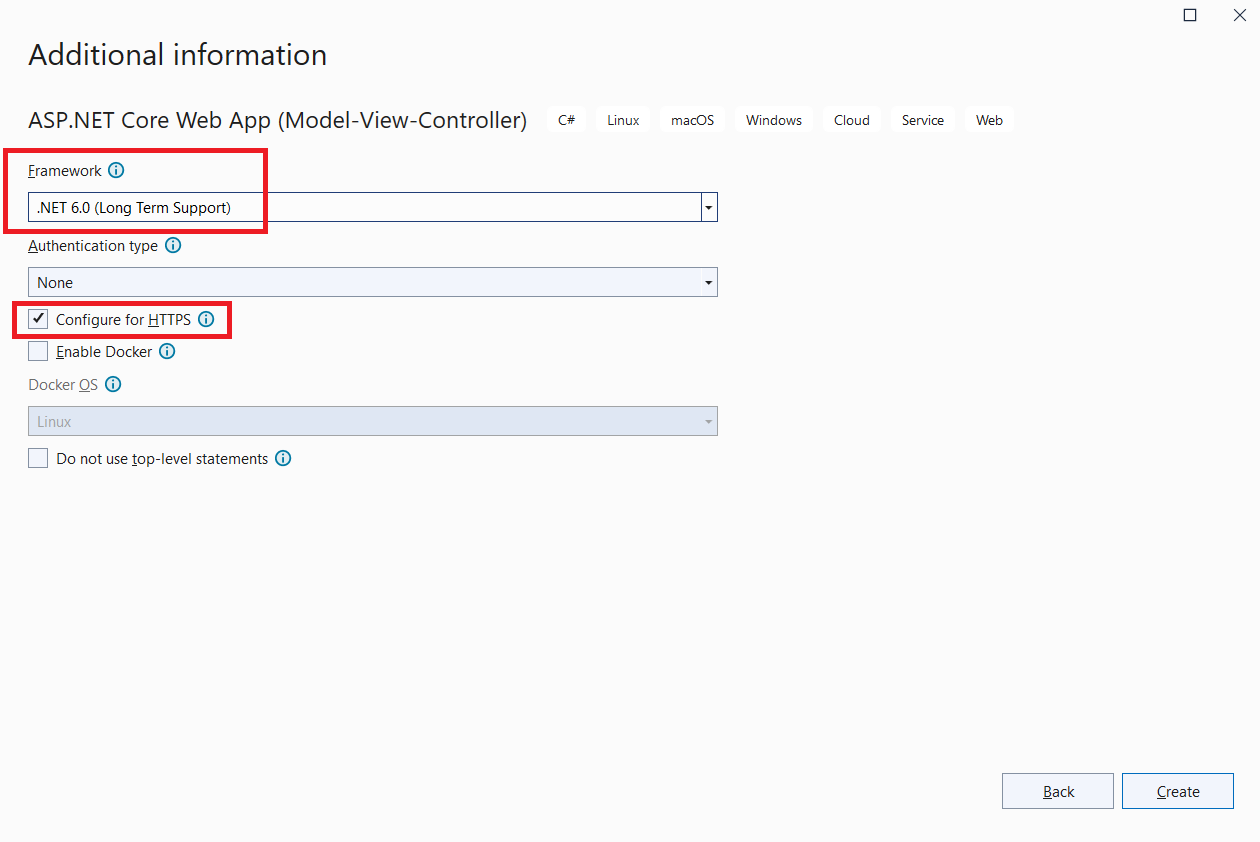
On Additional information dialog, make sure Framework is .NET 6.0, and Configure for HTTPS checkbox is selected.
Your MVC app is now created successfully. In the next step, you will configure this app to use Cognito authentication.
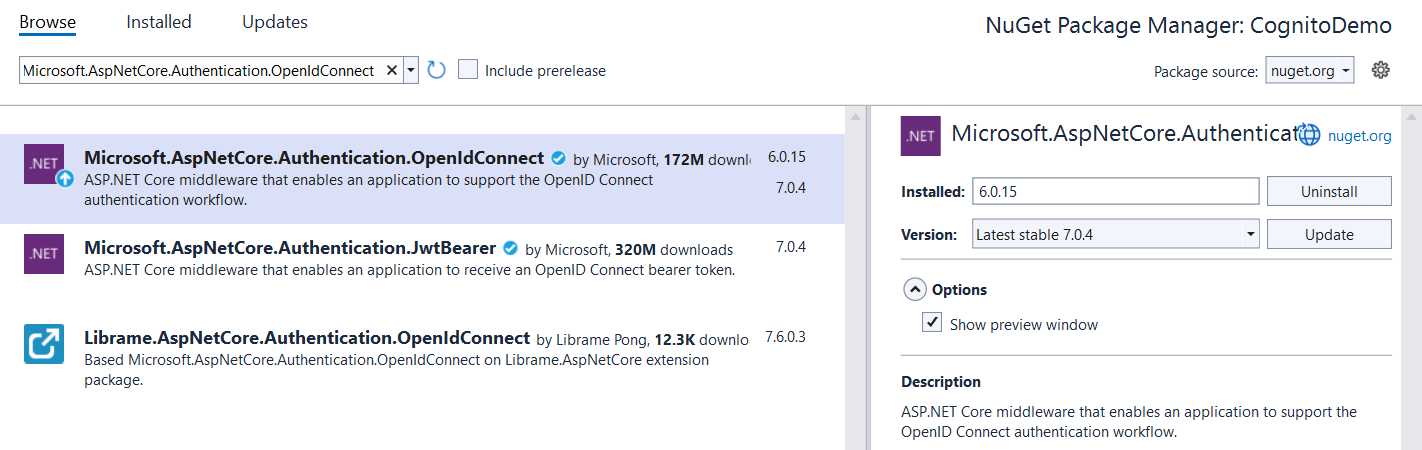
Install the Microsoft.AspNetCore.Authentication.OpenIdConnect NuGet package.
☞ Note that the latest version of this NuGet package may not support .NET 6, so install a version that supports your current .NET version.
Next, navigate to the appsettings.json file and replace the existing content with the following. Also, replace the placeholders with their actual values.
{
  "Logging": {
    "LogLevel": {
      "Default": "Warning"
    }
  },
  "AllowedHosts": "*",
  "Authentication": {
    "Cognito": {
      "ClientId": "<app client id from AWS Cognito>",
      "ClientSecret": "<client-secret>",
      "MetadataAddress": "https://cognito-idp.<your region>.amazonaws.com/<your-pool id>/.well-known/openid-configuration",
      "ResponseType": "code",
      "SaveToken": true,
      "AppSignOutUrl": "/Account/SignOutSuccessful",
      "CognitoDomain": "https://<custom domain name>.auth.<your region>.amazoncognito.com"
    }
  }
}
Next, Go to the Program.cs file, and make the changes as per the instructions given below.
using Microsoft.AspNetCore.Authentication.Cookies;
using Microsoft.AspNetCore.Authentication.OpenIdConnect;
builder.Services.AddAuthentication(item =>
{
    item.DefaultScheme = CookieAuthenticationDefaults.AuthenticationScheme;
    item.DefaultChallengeScheme = OpenIdConnectDefaults.AuthenticationScheme;
})
.AddCookie()
.AddOpenIdConnect(OpenIdConnectDefaults.AuthenticationScheme, options =>
{
    options.ResponseType = builder.Configuration["Authentication:Cognito:ResponseType"];
    options.MetadataAddress = builder.Configuration["Authentication:Cognito:MetadataAddress"];
    options.ClientId = builder.Configuration["Authentication:Cognito:ClientId"];
    options.ClientSecret = builder.Configuration["Authentication:Cognito:ClientSecret"];
    options.Events = new OpenIdConnectEvents()
    {
        // This method enables logout from Amazon Cognito, and it is invoked before redirecting to the identity provider to sign out
        OnRedirectToIdentityProviderForSignOut = OnRedirectToIdentityProviderForSignOut
    };
    options.Scope.Clear();
    options.Scope.Add("openid");
    options.Scope.Add("email");
    options.Scope.Add("phone");
    options.SaveTokens = Convert.ToBoolean(builder.Configuration["Authentication:Cognito:SaveToken"]);
});
app.UseAuthentication();
app.UseAuthorization();
OnRedirectToIdentityProviderForSignOut method.
// This method performs a Cognito sign-out, and then redirects user back to the application
Task OnRedirectToIdentityProviderForSignOut(RedirectContext context)
{

    context.ProtocolMessage.Scope = "openid";
    context.ProtocolMessage.ResponseType = "code";

    var cognitoDomain = builder.Configuration["Authentication:Cognito:CognitoDomain"];

    var clientId = builder.Configuration["Authentication:Cognito:ClientId"];

    var logoutUrl = $"{context.Request.Scheme}://{context.Request.Host}{builder.Configuration["Authentication:Cognito:AppSignOutUrl"]}";

    context.ProtocolMessage.IssuerAddress = $"{cognitoDomain}/logout?client_id={clientId}&logout_uri={logoutUrl}";

    return Task.CompletedTask;
}
After making the changes listed above, your Program.cs file should look like this.
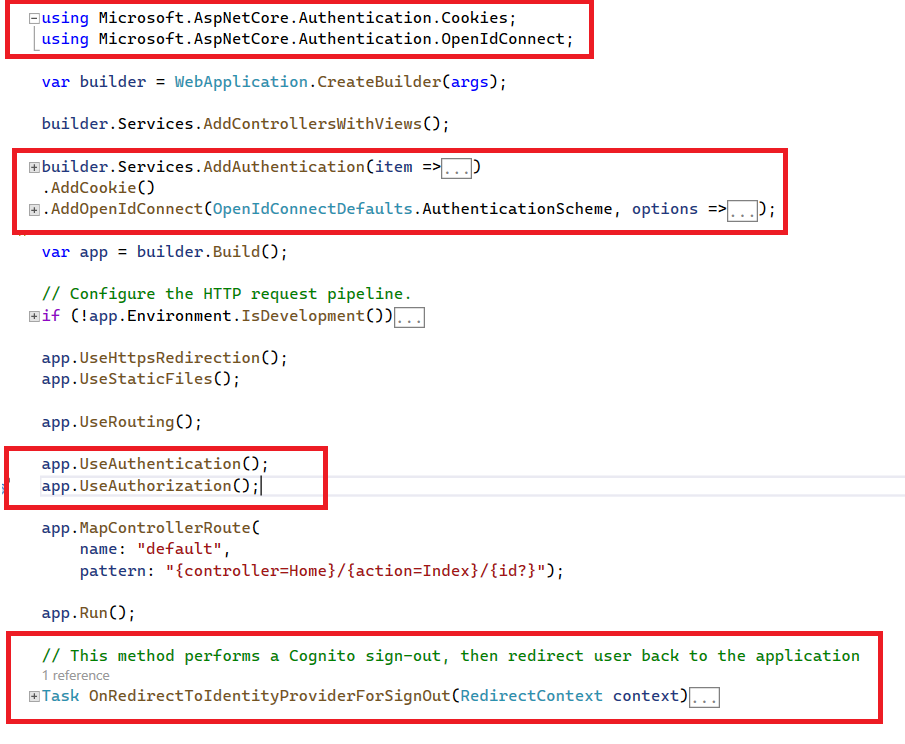
Now, let's understand the changes you made in your Program.cs file.
First, you added the required namespaces.
Second, you added Cookie based authentication to your application. You also registered another authentication scheme named OpenIdConnect with AddOpenIdConnect method to authenticate users from Amazon Cognito.
Since you have set DefaultChallengeScheme to OpenIdConnectDefaults.AuthenticationScheme, the application redirects users to the configured Cognito hosted login page for unauthneticated requests, rather than redirecting them to the local /Account/Login page.
Third, you also configured OnRedirectToIdentityProviderForSignOut event for OpenIdConnect authentication scheme to perform Cognito signout. That event is invoked once the user performs HttpContext.SignOutAsync(OpenIdConnectDefaults.AuthenticationScheme) in the application. This method redirects the user to the Cognito logout endpoint with a logout_uri and client_id parameter. Cognito performs a sign-out by clearing the user's session cookies and then redirecting the user back to a logout_uri that belongs to your application.
Now that you've configured Cognito authentication in your app, it's time to make some changes to see if authentication is working as expected.
Follow the instructions below to make the changes to your application.
Add [Authorize] attribute on HomeController class.
[Authorize]
public class HomeController : Controller
{
  // controller code
}
Update the content of ~\View\Home\Index.cshtml file with the following.
@using System.Security.Claims;
@{
    ViewData["Title"] = "Home Page";
}

@if (User.Identity.IsAuthenticated)
{
    <p>
        Authenticated!
    </p>
    <table class="table table-bordered">
        <tr>
            <th>Claim Type</th>
            <th>Value</th>
        </tr>
        @foreach (var item in User.Claims)
        {
            <tr>
                <td>
                    @item.Type
                </td>
                <td>
                    @item.Value
                </td>
            </tr>
        }
    </table>
}
Create a new AccountController and add the following code there.
public class AccountController : Controller
{
    public async Task SignOut()
    {
        // Note: To sign out the current user and delete their cookie, call SignOutAsync

        // 1. Initiate signout for cookie based authentication scheme
        await HttpContext.SignOutAsync(CookieAuthenticationDefaults.AuthenticationScheme);

        // 2. Initiate signout for OpenID authentication scheme
        await HttpContext.SignOutAsync(OpenIdConnectDefaults.AuthenticationScheme);
    }

    public ActionResult SignOutSuccessful()
    {
        return View();
    }
}
Add ~\View\Account\SignOutSuccessful.cshtml file with the following content.
<h1>SignOut</h1>
<p>You have been logged-out successfully from the application.</p>
In _Layout.cshtml, add a sign-out link to the navigation bar.
@if (User.Identity.IsAuthenticated)
{
    <li class="nav-item">
        <a class="nav-link text-dark" asp-area="" asp-controller="Account" asp-action="SignOut">SignOut</a>
    </li>
}
Finally, open the launchSettings.json file and configure the app to launch at the URL https://localhost:4200.
{
  "iisSettings": {
    ...
  },
  "profiles": {
    "CognitoDemo": {
      "commandName": "Project",
      "dotnetRunMessages": true,
      "launchBrowser": true,
      "applicationUrl": "https://localhost:4200;http://localhost:5026", // <-- This must include: https://localhost:4200
      "environmentVariables": {
        "ASPNETCORE_ENVIRONMENT": "Development"
      }
    },
    "IIS Express": {
      ...
    }
  }
}
To enable Claims-based authorization with Cognito, you will leverage Cognito Groups. This requires you to create a Cognito group first.
After that, go to your Program.cs file, add the instructed code block in your file.
var builder = WebApplication.CreateBuilder(args);

// ------ Add this code block -----
builder.Services.AddAuthorization(options =>
{
    options.AddPolicy("AdminOnly", policy => policy.RequireClaim("cognito:groups", "Admin"));
});
Finally, modify the [Authorize] attribute to include the policy name.
[Authorize(Policy = "AdminOnly")]
public class HomeController : Controller
{
  ...
}
That's all. You're done!
Because you are authenticating your users through Cognito, you may also require the Access Token in order to call your APIs that are secured through the same Cognito instance.
To retrieve the access token for your current user, use the code below in your MVC application.
string accessToken = HttpContext.GetTokenAsync("access_token").Result;
In this post, you learned how to use Amazon Cognito as an Identity Provider in your ASP.NET Core application and authenticate users using a Cognito Hosted UI. Please leave your thoughts and feedback in the section below.
Thank You ❤️